HOW TO MAKE A PINATA
I'm going to show you how to make a pinata. Even if you are not very craft minded, it is very easy to make a pinata at home and it requires only the minimal of creative skills.

Psst... while you're here why not download the Ultimate Guide To Kids Party Success from Lock Paper Scissors. It's written by parents to be jam-packed full of the best party tips on the planet: Signup below to download:
It is also a great craft for kids to do so get them to help you. But be prepared for some mess!
There are two main types of pinata :
1. The ordinary one which I am going to show you how to make here and
2. The string pull pinata which is more suitable for younger kids.
Here are the Rules of the Pinata Game.

ITEMS YOU NEED - HOW TO MAKE A PINATA
- Sheets of newspaper (lots)
- Wallpaper paste or papier maché paste.
- Large bowl for mixing the glue
- Wooden spoon
- Large balloon
- Two x 1.2 meter lengths of string
- Craft knife
- Pin
- Colored lengths of crepe paper - cut into 5 cm wide strips and approximately 40-50 cm long
- Poster paints and brush
- Sweets, trinkets

METHOD - HOW TO MAKE A PINATA
NOTE: Make your Pinata at least a week in advance of the party in order to allow it to dry out completely.
- Tear the newspaper into strips, roughly 1 inch wide and 8 inches long.
- Using the bowl, make the paper mache paste or make up the glue according to the manufacturer's instructions.
- Blow up and tie the balloon.
- Dip individual strips of newspaper into the glue and then apply the strips in a roughly even layer all over the balloon, overlapping each strip slightly. The strips can be laid horizontally and vertically which adds to the strength of the Pinata. Make sure to leave the balloon knot exposed.
- Once you have done three layers of paper mache (2 for the preschoolers), drape one piece of string over the top and down the sides of the balloon. Both ends of the string should extend beyond the knotted end of the balloon by approximately 1 foot. Repeat this process with the second piece of string but this time lay it at right angles to the first piece.
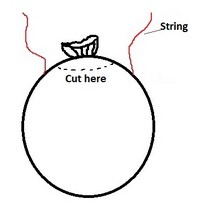
Cover the balloon and strings with 1-3 more layers of paper mache. Make sure that you don't paper mache the strings right up to the knot of the balloon as you will need to cut a 3 inch hole later (see diagram on right) and you don't want to cut the strings.
Aim to do about 3-6 layers in total. The more layers you do, the harder the Pinata is to break.

Leave the paper mache to dry completely. This may take from 2-5 days depending on the environment. The best place to dry it is your airing cupboard if you have one.
Once the Pinata is completely dry, burst the balloon with the pin. Then using the craft knife carefully cut out a hole from the top (the end where the balloon's knot was) about 3 inches in diameter. Don't cut the circle completely off, as you will need it to recover the hole later on.
Fill the Pinata with sweets and trinkets and then close the hole over. Secure the circle lid with either masking tape of a couple of strips of paper mache.
Now comes the fun bit whereby you can let your imagination run wild. Paint the Pinata in vibrant bright colors and patterns and then glue on the strips of colored crepe paper so that they hang down from the Pinata. You could also stick on paper party hats to give a funkier look.
Allow to dry completely. I hang mine in an airing cupboard (mind getting glue on your linen) or you can speed things up by using a hairdryer.
Once it is dry and you are ready to play, tie a loop with the 4 strings so that you can suspend your pinata from a tree or whatever post you are using. Your Pinata is now ready to be destroyed!!
HOW TO
Here is a video on how to make a star pinata from "How It's Made". It always helps to have a visual when making something.