DIY PULL STRING PINATA
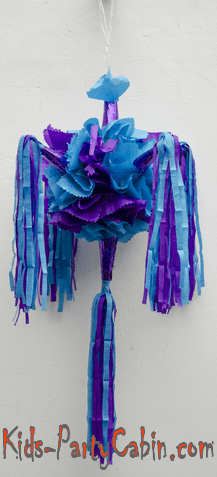
Fancy making your own DIY Pull String Pinata? Well I'm going to show you how and it really is not difficult, maybe just a bit messy.

With the more traditional pinata game (instructions here), the kids take it in turns to bash the pinata with a stick until it breaks and all the goodies inside come tumbling out.
However, with the pull string pinata, there are a selection of ribbons/strings hanging from the base of the pinata and the kids take it in turns to pull a ribbon. Only one ribbon opens the base of the pinata so that the goodies can come out.
OK ready to make a pull string pinata?
Skill : Easy
EQUIPMENT FOR YOUR DIY PULL STRING PINATA
- Sheets of newspaper (lots)
- Wallpaper paste or paper mache paste
- Large bowl for mixing the glue
- Wooden spoon
- Large round balloon
- Two x 7 foot lengths of string for suspending the pinata
- Long strips of colored ribbon (one for each player)
- Craft knife
- Pin
- Poster paints and brush
- Sweets, trinkets

MAKING YOUR DIY PULL STRING PINATA
Top Tip: Make your pull string Pinata at least a week in advance of the party in order to allow it to dry out completely.
1. Tear the newspaper into strips, roughly 3 cm wide and 20 cm long.
2. Using the bowl, make the paper mache paste or make up the glue according to the manufacturer's instructions.
3. Blow up and tie the balloon.
4. Dip individual strips of newspaper into the glue and then apply the strips in a roughly even layer all over the balloon, overlapping each strip slightly. The strips can be laid horizontally and vertically which adds to the strength of the Pinata. Make sure to leave the balloon knot slightly exposed.
5. Cover the balloon with about 3-6 layers of paper mache in total. The more layers you do, the harder the Pinata is to break so only do 3 layers for the preschoolers.
6. Leave the paper mache to dry completely. This may take from 2-5 days depending on the environment. The best place is your airing cupboard if you have one.
7. Once the Pinata is completely dry, burst the balloon with the pin. Then using the craft knife carefully make 4 small holes in a cross pattern at the top (the end where the balloon's knot was).
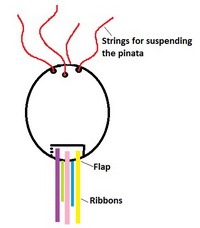
8. Thread a string through one hole and then pass it through the opposite hole and adjust the string so that there is an equal amount coming out of each hole. Repeat with the other string and the other 2 holes. These strings will be used for suspending your pinata.
9. The next bit is a bit tricky. At the other end of the pinata, cut a 3 sided flap about 3-4 inches square. In the flap punch several holes (one for each ribbon).
10. Thread a ribbon through one hole and knot one end so that you have the ribbon hanging down from the pinata and with the knot hidden. This ribbon will be the one to pull open the flap and allow the goodies to fall out of the pinata. Repeat for all the ribbons but don't tie a knot in the end.

11. Thread all the other ribbons through the holes (one in each hole), but this time don't tie a knot in the end.
12. Fill the Pinata with sweets and trinkets and then close the flap. Secure the flap with a couple of strips of paper mache. Leave to dry.
13. Now comes the fun part. Decorate your pinata however you want using paint, colored paper, streamers or whatever takes your fancy.
14. Suspend your DIY pull string pinata from a tree or whatever post you are using and then you are ready to play the Pinata game.